How to Fix Windows Update Error 0x80070057
Ah, Windows Update Error 0x80070057. What a fine error this is, of a dignified vintage, well-known to Windows users across the ages. Irritant to sysadmins across the land, this error has been plaguing our systems since at least Windows XP, arriving as an accompaniment to a number of system errors.
As such, it isn’t an entirely difficult error to fix, and I can show you exactly how to take care of it.
Unknown Error; Unspecified Parameters; Service Not Running
The message arriving with error 0x80070057 can vary, depending on where the error in the update service is found, but it is usually a variant of “Unknown error,” “Unspecified parameters encountered,” or simply that the “Required services are not running.” The update service or the activity you were engaged with then ends, plonking you firmly back to square one.
While this error hadn’t disappeared, the recent Windows 10 Anniversary Update, or Windows 10 Build 1607, has seen numerous reports of the error. As this error usually relates to the Windows Update process, many users were unhappy as their systems were left with either an uncompleted update process, temporarily “breaking” their system, or were simply forced back to Windows 10 Build 1507 (aka Threshold 1).
Error 0x80070057 usually occurs when:
- You are trying to back up your files, and there is a corruption.
- You are trying to install a Windows operating system and the System Reserved Partition is corrupted.
- Corrupt registry or policy entries are interfering with the Windows Update process.
- There were some problems installing updates, and the system will attempt to try again later.
All jolly irritating, all jolly fixable.
We’ll Try Again Later
Following the Anniversary Update, some Windows 10 users are encountering the following Windows Update error message:
There were some problems installing updates, but we’ll try again later. If you keep seeing this and want to serach the web or contact support for information, this may help – (0x80070057).
There are a number of ways we can attempt to alleviate this issue.
Rename the SoftwareDistribution Folder
Press Windows key + R to open the Run dialogue, then type %SystemRoot% and press Enter. Scroll down to find the SoftwareDistribution folder. Rename this SoftwareDistributon.old. Now restart your computer, and attempt the update.
Change the Windows Registry
If this doesn’t work, we can make changes to the Windows Registry. Press Windows key + R to open the Run dialogue, then type regedit and press Enter.
Ensure the following registry entries match your own:
[HKEY_LOCAL_MACHINE\SOFTWARE\Microsoft\WindowsUpdate\UX] "IsConvergedUpdateStackEnabled"=dword:00000000
[HKEY_LOCAL_MACHINE\SOFTWARE\Microsoft\WindowsUpdate\UX\Settings] "UxOption"=dword:00000000
Make the changes if necessary, then reboot your system and attempt the upgrade.
The Parameter Is Incorrect
In this instance, the backup process begins, using Windows inbuilt service. The process fails, generating the message:
An internal error has occurred: The parameter is incorrect: (0x80070057)
Press Windows key + R to open the Run dialogue. Type regedit and press Enter. Now, find the following registry key:
HKEY_LOCAL_MACHINE\SOFTWARE\Policies\Microsoft\SystemCertificates
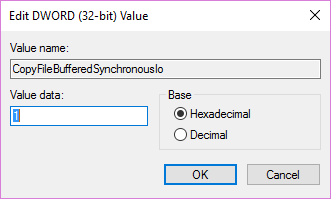
Right-click SystemCertificates, and create New > DWORD (32-bit) Value. Enter the name as CopyFileBufferedSynchronousIo, and set the Value to 1. Hit OK, then restart your system. Your backup should now complete!

Alter Decimal Symbol
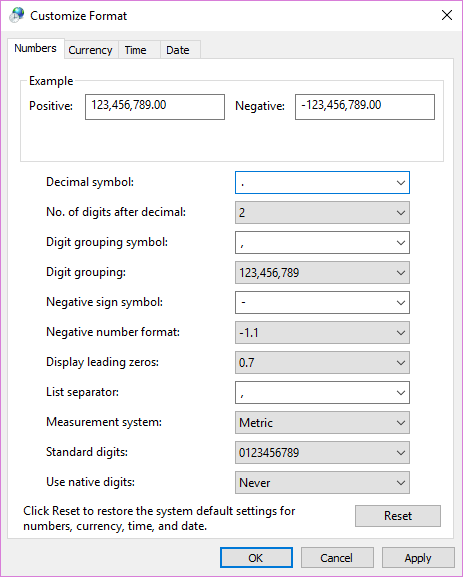
Head to Control Panel > Clock, Language, and Region. Under Region, select Change date, time, or number formats. This will open a new panel. Select Additional Settings. Ensure there is a period (full-stop) next to the Decimal symbol option, then press Apply, and OK.

Group Policy Interference
This hasn’t been the case for everyone, but when Windows 10 was released many users (understandably) took affront to the archaic Windows Update system metered out by Microsoft. Windows 10 Home users were largely bound to this system, but Windows 10Pro users had the option to alter their Group Policy settings as to render the update system impotent.
However, interfering with this policy may be exactly what is causing the issue to the Windows Update process.
Press Windows key + R to open the Run dialogue. Type gpedit.msc and press Enter. Now follow this path Computer Configuration > Administrative Templates > Windows Components > Windows Update > Configure Automatic Updates > Not Configured.

Restart your system, and hopefully the update will now complete.
Use the System File Checker
Windows has an inbuilt System File Checker tool we can use to scan the system for any potentially corrupted files. This tool will detail and potentially fix any unexpected corruptions, returning the system to good working state.
Open an elevated Command Prompt by right-clicking the Start Menu and selecting Command Prompt (Admin). Now run the following command:
sfc /scannow
This command can take a little time to complete. Do not close the Command Prompt window until the verification is 100% complete. On completion, you’ll receive one of the following messages:
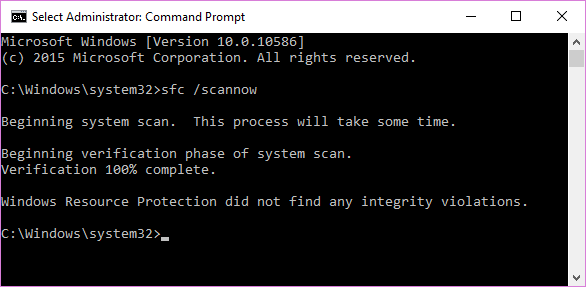
- Windows Resource Protection did not find any integrity violations.Your system did not contain any corrupted files; you need to try another fix for this issue
- Windows Resource Protection could not perform the requested operation.You need to reboot your system into Safe Mode, then run the command
- Windows Resource Protection found corrupt files and successfully repaired them. Details are included in the CBS.Log %WinDir%\Logs\CBS\CBS.log.To view the details of what the System File Checker fixed, see the instructions below
- Windows Resource Protection found corrupt files but was unable to fix some of them. Details are included in the CBS.Log %WinDir%\Logs\CBS\CBS.log.You’ll need to manually repair the corrupted files. Follow the below instructions to find the corrupted file, then manually replace with a known good copy of the file.

Access the Log
If you receive either of final pair of messages, you’ll probably want to have a look at the System File Check log. This is especially important if you received the final message.
First, you’ll need to open an elevated Command Prompt by right-clicking the Start menu and selecting Command Prompt (Admin). Now run the following command:
findstr /c:"[SR]" %windir%\Logs\CBS\CBS.log >"%userprofile%\Desktop\sfcdetails.txt"
This will copy the details of the log to a plain notepad file that you’ll find on your desktop. As my Windows installation is pretty much brand new, I’m yet to encounter any issues. As such, my log looks like so:

However, if you had corrupted files that the SFC process was unable to automatically replace, you’ll spot some entries like this (taken from the Microsoft Support document on the System File Checker):
2007-01-12 12:10:42, Info CSI 00000008 [SR] Cannot
repair member file [l:34{17}]"Accessibility.dll" of Accessibility, Version =
6.0.6000.16386, pA = PROCESSOR_ARCHITECTURE_MSIL (8), Culture neutral,
VersionScope neutral, PublicKeyToken = {l:8 b:b03f5f7f11d50a3a}, Type
neutral, TypeName neutral, PublicKey neutral in the store, file is missing
Manually Replacing Corrupted Files
We can now replace the corrupted file with a known good copy, again using the Command Prompt. First, you’ll need to open an elevated Command Prompt by right-clicking the Start menu and selecting Command Prompt (Admin). We’ll now need to take administrative ownership of the corrupted file. Please note that in each listed instance you should replace pathandfilename with the information provided in the sfcdetails.txt created in the previous section.
Use the following command:
takeown /f pathandfilename

Now use the following command to grant administrators full access to the corrupted file system:
icacls pathandfilename/grant administrators:F
Finally, replace the corrupted system file with a known good copy by using the following command:
copy sourcefile destinationfile
For instance, if you’ve copied a known good system file from a system running the same operating system (and same version, same build etc.) onto a USB, the command might look like this:
copy f:\usbstick\jscript.dll c:\windows\system32\jscript.dll
Using DISM
If the manual replacement is proving too difficult, or if there are too many files to replace, we can use the DISM command. DISM stands for Deployment Image & Serving Management, and we can use this command in an attempt to download and restore the systems file health. From an elevated Command Prompt, enter the following command:
DISM /Online /Cleanup-Image /RestoreHealth
Depending on your system health and the level of corruption present, this command could take a while to complete. This process has been known to appear to hang at 20%. If that happens, just wait for a while, it should continue of its own accord. Once it is finished, check if any files have been replaced. If they have, you’ll need to restart your computer, then run the sfc /scannow command again. It should replace the corrupted file this time around.
Reset Windows Update Repository
On occasion, we can reset the Windows Update repository in an attempt to relieve the issue. This is a somewhat lengthy process that I am not going to detail in this article.
However, I will point you to the Microsoft Support document that details the entire process, so you can attempt this fix with their information.
Windows Update Troubleshooter
I’m not sure how well the Windows Update Troubleshooter works for this error, as it can be directly affected by group policies and other system settings. But if you’re still unable to complete an update, it could be worth downloading and giving it a shot. It can only fail, too, right? Right?!
Head to this page and download the Windows Update Troubleshooter. Once downloaded, run the troubleshooter. Select Windows Update, and then select Advanced, then Run as administrator. This will run the troubleshooter as an Administrator, and will be able find and resolve a wider range of issues. Press Next.
The troubleshooter will automatically scan your system for issues affecting Windows Update. If any issues are found, the troubleshooter will automatically attempt to fix them, unless you unticked the automatic fix box.
Labels: How to Fix Windows Update Error 0x80070057, windows error, windows update error


0 Comments:
Post a Comment
Subscribe to Post Comments [Atom]
<< Home